How to Speed Up a Slow Laptop: 12 Proven Steps That Work in 2026
INTRODUCTION
Your laptop was fast when you first got it. Now it crawls, freezes, and tests your patience every single day. You want to know how to speed up a slow laptop without spending money on a new device, and you have come to the right place.
The good news is that most slow laptops do not need replacing. They need cleaning, tuning, and a few smart setting changes that most people never discover. In this guide you will learn 12 proven steps that genuinely fix a slow laptop on both Windows and Mac, covering everything from disabling hidden startup programs to clearing system junk, upgrading RAM, and adjusting power settings that silently throttle your performance.
Every step is explained simply, with exact instructions so you can follow along right now. Let us start with the fastest wins and work toward the deeper fixes.
Why Is Your Laptop So Slow? The Most Common Reasons
Before fixing the problem, you need to understand what causes it. A slow laptop almost always traces back to one or more of these core issues, and knowing which one affects your machine helps you prioritize the steps below.
- Too many startup programs launch silently in the background every time you turn on your laptop, consuming RAM and CPU before you even open a browser
- A nearly full hard drive forces Windows and macOS to work harder because both operating systems need free space for virtual memory, temporary files, and system processes
- Outdated operating system and drivers miss performance improvements and bug fixes that newer updates include
- Accumulated junk files and cache from browsers, apps, and system processes fill storage and slow read-write speeds over time
- Malware or viruses consume CPU and memory in the background, sometimes without any obvious sign other than general sluggishness
- Overheating causes your laptop’s processor to automatically reduce its speed to protect itself, a process called thermal throttling that silently cuts performance
- Insufficient RAM forces your laptop to use the much slower hard drive as temporary memory whenever it runs out of physical RAM
- An old spinning hard disk drive (HDD) instead of a solid state drive (SSD) is one of the most common reasons older laptops feel painfully slow compared to newer ones
Most users find that fixing just two or three of these causes makes their laptop feel dramatically faster. Work through the steps below in order, starting with the ones that cost nothing and take under five minutes.
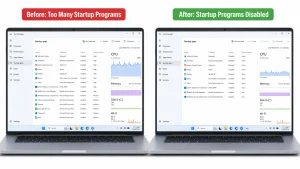
Step 1: Disable Startup Programs to Speed Up Your Laptop Immediately
Disabling unnecessary startup programs is the single fastest free fix available for a slow laptop. Every app you have ever installed may have added itself to your startup list, launching silently in the background every time you switch on your device. These programs consume RAM and CPU from the very first moment your laptop starts, making everything feel slow before you have even opened a single file.
How to Disable Startup Programs on Windows
- Press Ctrl + Shift + Esc on your keyboard to open Task Manager
- Click the Startup apps tab at the top of the window
- Look at the Startup impact column on the right side and focus on items marked High
- Right-click any program you do not need immediately on startup, such as Spotify, Discord, OneDrive, Teams, or Zoom
- Select Disable for each one
- Restart your laptop and notice the difference in boot speed
You do not delete these programs by disabling them from startup. They still work perfectly when you open them manually. You simply stop them from launching automatically every time you turn on your device, which frees up a significant amount of RAM and CPU for everything else.
How to Disable Startup Programs on Mac
- Click the Apple menu in the top left corner and select System Settings
- Click General then Login Items and Extensions
- Review the list under Open at Login and select any app you want to remove
- Click the minus button at the bottom of the list to stop it from launching on startup
Step 2: Clear Junk Files and Free Up Disk Space
A full hard drive is one of the most common causes of a slow laptop. Windows needs at least 10 to 15 percent of your disk free to run efficiently, and macOS needs even more. When your drive fills up, the operating system struggles to write temporary files, cache data, and manage virtual memory, all of which slows everything down noticeably.
Clear Junk Files on Windows
- Press the Windows key, type Disk Cleanup, and open the app
- Select your main drive, usually C:, and click OK
- Wait for the scan to finish, then check the boxes for Temporary files, Recycle Bin, Thumbnails, and Temporary Internet Files
- Click OK then Delete Files to confirm
- Also click Clean up system files at the bottom for an even deeper clean
Alternatively, go to Settings then System then Storage then Cleanup Recommendations in Windows 11 for a guided version of this process that also identifies large unused files and apps taking up space.
Clear Junk Files on Mac
- Click the Apple menu and select About This Mac
- Click More Info then scroll to Storage
- Review the categories shown and click Storage Settings to access cleanup recommendations
- Enable Optimise Mac Storage and Empty Trash Automatically to keep storage clean ongoing
Step 3: Clear Your Browser Cache to Free Up Memory
Your web browser stores temporary files, images, scripts, and cookies from every website you visit. Over months and years, this cache grows to several gigabytes and slows down both your browsing and your overall system performance. Clearing it takes two minutes and delivers an immediate improvement.
Clear Cache in Google Chrome
- Open Chrome and press Ctrl + Shift + Delete on Windows or Command + Shift + Delete on Mac
- Set the time range to All time
- Check Cached images and files and Cookies and other site data
- Click Clear data
Repeat the same process in Firefox, Edge, or Safari if you use multiple browsers. Each browser stores its own separate cache, so clearing one does not affect the others.
Step 4: Update Windows and Drivers for Better Performance
Outdated software is a hidden performance killer that most users ignore. Operating system updates include performance improvements, security patches, and bug fixes that can meaningfully improve how fast your laptop runs. Driver updates for your graphics card, network adapter, and storage controller can resolve bottlenecks that slow specific tasks dramatically.
Update Windows
- Go to Settings then Windows Update
- Click Check for updates
- Install all available updates and restart your laptop when prompted
- Check for updates again after restarting because some updates only become available after previous ones install
Update Drivers on Windows
- Press Windows key + X and select Device Manager
- Right-click your graphics adapter under Display Adapters and select Update driver
- Choose Search automatically for drivers
- Repeat for your network adapter and storage controller listed in the device tree
For Mac, go to Apple menu then System Settings then General then Software Update and install all available macOS updates, which include both system and driver improvements in a single package.
Manager reduces CPU and RAM usage from the moment your
laptop turns on. This one step alone can cut boot time
by 30 to 60 seconds on most laptops.
Step 5: Run a Malware Scan to Remove Hidden Performance Drains
Malware and viruses silently consume your CPU and RAM in the background. Many infections show no obvious symptoms beyond general slowness, which is why so many users never connect their laptop’s poor performance to a malware infection. Running a scan is free, takes under ten minutes, and should be part of your regular maintenance routine.
Scan for Malware on Windows
- Press the Windows key, type Windows Security, and open the app
- Click Virus and threat protection
- Click Quick scan for a fast check of the most vulnerable areas
- For a complete scan, click Scan options and select Full scan
- Follow any prompts to remove or quarantine detected threats
Windows Defender is effective for most users, but if you want a second opinion, download and run Malwarebytes Free which checks for threats that Defender sometimes misses. Always download security software directly from the official developer website to avoid accidentally installing more malware.
Step 6: Adjust Power Settings to Stop Your Laptop Throttling Itself
Most laptops ship with a power-saving mode active as the default setting. This mode deliberately limits your processor speed to conserve battery life, which makes your laptop feel slower than it actually is, especially when plugged into a wall outlet. Switching to a balanced or high-performance power plan unlocks the full speed your processor is capable of delivering.
Change Power Settings on Windows
- Go to Settings then System then Power and battery
- Click Power mode and change it from Best power efficiency to Balanced
- When you are plugged in and need maximum performance, switch to Best performance
- Switch back to Balanced when running on battery to preserve charge
Adjust Energy Settings on Mac
- Go to Apple menu then System Settings then Battery
- Set Low Power Mode to Never when plugged in
- Enable Automatic graphics switching if your Mac has dual graphics cards to let it use the more powerful GPU when needed
Step 7: Check for Overheating and Clean Your Laptop Vents
Overheating causes your processor to slow itself down automatically to avoid damage. This thermal throttling can cut your laptop’s performance by 30 to 50 percent or more without any warning message or error. If your laptop feels hot to the touch or its fans run constantly and loudly, overheating is likely stealing significant speed from your device.
- Place your laptop on a hard flat surface like a desk rather than on fabric like a bed, sofa, or carpet that blocks the vents underneath
- Look at the bottom and sides of your laptop for intake and exhaust vents
- Use a can of compressed air to blow short bursts into each vent, dislodging accumulated dust without creating static electricity
- If your laptop is older than two years, consider using a laptop cooling pad with its own built-in fan to improve airflow during intensive tasks
- On Windows, open Task Manager and check the CPU temperature under the Performance tab to confirm whether overheating is occurring
Dust is the primary enemy of laptop cooling. Even a thin layer of dust on the internal fan blades reduces airflow significantly. A compressed air clean every three to six months prevents most overheating-related slowdowns without requiring you to open the laptop case.
Step 8: Uninstall Programs You No Longer Use
Unused programs take up storage space, add entries to system registries, and sometimes run background services even when you never open them. Removing them frees disk space, reduces system overhead, and can even speed up virus scans and system searches that previously had to index their files.
Uninstall Programs on Windows
- Go to Settings then Apps then Installed apps
- Sort the list by Size to find the largest programs first
- Click the three-dot menu next to any program you no longer use and select Uninstall
- Pay particular attention to old games, duplicate media players, trial software, and manufacturer-installed bloatware that came pre-loaded on your device
Uninstall Programs on Mac
- Open Finder and click Applications in the left sidebar
- Sort by Date Modified to find apps you have not opened in months
- Drag any unwanted app to the Trash or right-click and select Move to Trash
- Empty the Trash to permanently free the storage space
Step 9: Disable Visual Effects to Instantly Speed Up a Slow Laptop
Windows and macOS both use animations, transparency effects, and visual transitions that consume GPU and CPU resources. On a fast modern laptop these effects are invisible to performance. On an older or lower-specification device, they noticeably slow down the interface. Turning them off delivers an immediate speed improvement you can feel.
Disable Visual Effects on Windows
- Press Windows key + R, type sysdm.cpl, and press Enter
- Click the Advanced tab then click Settings under Performance
- Select Adjust for best performance to disable all effects at once
- Or click Custom and uncheck specific effects like Animate windows when minimizing and maximizing and Show shadows under windows
- Click Apply then OK
Reduce Motion on Mac
- Go to Apple menu then System Settings then Accessibility
- Click Display then toggle on Reduce Motion
- Also toggle on Reduce Transparency to stop macOS from rendering translucent window backgrounds
Step 10: Use Storage Sense and Smart Storage Habits to Keep Your Laptop Fast
Windows 11 includes a built-in tool called Storage Sense that automatically deletes temporary files, empties the Recycle Bin, and manages storage on a schedule. Enabling it means your laptop maintains free disk space automatically without requiring you to run manual cleanup routines every month.
- Go to Settings then System then Storage
- Toggle on Storage Sense
- Click Storage Sense to configure how often it runs and which items it cleans automatically
- Set it to run every month and to delete Recycle Bin contents older than 14 days
Also move large files to external storage or cloud services like Google Drive, OneDrive, or Dropbox. Your photos, videos, and downloaded files are often the largest storage consumers on your laptop, and keeping them in cloud storage rather than on your local drive frees space without losing access to your content.
Step 11: Upgrade Your RAM to Speed Up a Slow Laptop Significantly
If your laptop has 4GB or 8GB of RAM and regularly runs multiple applications, a RAM upgrade is one of the most impactful performance improvements available. When your laptop runs out of physical RAM, it uses a section of the hard drive as temporary memory. This swap space is dramatically slower than actual RAM, which causes the freezing and lagging that makes laptops feel unbearably slow under moderate workloads.
How to check your current RAM usage on Windows:
- Open Task Manager with Ctrl + Shift + Esc
- Click the Performance tab and select Memory
- Watch the memory usage while you work normally. If it consistently sits above 80 percent, a RAM upgrade will make a meaningful difference
Before purchasing RAM, check whether your laptop allows RAM upgrades. Many modern thin-and-light laptops solder RAM directly to the motherboard, making upgrades impossible. Check your laptop model’s specifications or service manual. If upgrading is possible, going from 8GB to 16GB of DDR4 or DDR5 RAM typically costs between $30 and $60 and delivers a noticeable improvement for multitasking, video editing, and running multiple browser tabs simultaneously.
For the official Microsoft guidance on checking and optimising RAM usage read the
Microsoft support guide on tips to improve PC performance in Windows
which covers memory management and system optimisation in detail.
Step 12: Upgrade from HDD to SSD for the Most Dramatic Speed Improvement
Replacing a traditional spinning hard disk drive (HDD) with a solid state drive (SSD) delivers the single most dramatic speed improvement available for any slow laptop. SSDs read and write data five to ten times faster than HDDs, which means your laptop boots in seconds instead of minutes, apps open almost instantly, and file operations that used to take thirty seconds complete in under three.
This upgrade is particularly powerful for laptops that are three to eight years old because most laptops sold before 2020 came with HDDs as the default storage. If your laptop still has an HDD, this one upgrade can make it feel like a completely different machine.
- Check your current drive type by opening Task Manager, clicking the Performance tab, and selecting your drive. If it says HDD, an SSD upgrade will transform your laptop’s speed
- Purchase a compatible SSD. A 500GB SSD from reputable brands like Samsung, Crucial, or Kingston costs between $40 and $70
- Clone your existing drive to the new SSD using free software like Macrium Reflect or Samsung Data Migration so you keep all your files and settings
- Physically swap the drive following your laptop’s service manual or a manufacturer-specific video guide
- Boot from the new SSD and enjoy a laptop that feels years faster than it did before
Even if you cannot upgrade the physical drive, moving to an external USB SSD for your most-used large files and downloads provides a meaningful speed benefit at low cost without opening your laptop at all.
For a comprehensive guide to choosing and installing the right SSD read
Norton’s complete guide to making your computer faster
and the detailed hardware advice from
HP’s guide on how to speed up your computer
which covers both software and hardware approaches with manufacturer-specific instructions.
Steps 1 through 10 are completely free and most take
under 10 minutes. Steps 11 and 12 involve optional
hardware upgrades that deliver the most dramatic
long-term performance improvements.
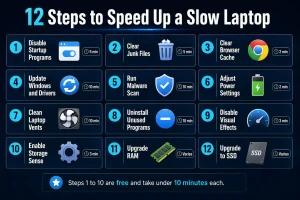
Quick Reference: How Long Each Step Takes and What It Costs
Here is a fast-reference summary so you can decide which steps to tackle first based on your available time and budget.
- Disable startup programs — 5 minutes — Free
- Clear junk files and free disk space — 5 minutes — Free
- Clear browser cache — 2 minutes — Free
- Update Windows and drivers — 10 to 30 minutes — Free
- Run a malware scan — 10 to 20 minutes — Free
- Adjust power settings — 2 minutes — Free
- Clean laptop vents — 10 minutes — Free or the cost of compressed air
- Uninstall unused programs — 10 minutes — Free
- Disable visual effects — 3 minutes — Free
- Enable Storage Sense — 3 minutes — Free
- Upgrade RAM — 30 minutes — $30 to $60 (if laptop allows it)
- Upgrade from HDD to SSD — 1 to 2 hours — $40 to $70
Steps 1 through 10 are completely free and require no technical skill. Start there and complete all ten before considering hardware upgrades. Most users report a significant improvement after the first five steps alone.
Frequently Asked Questions About Speeding Up a Slow Laptop
Why is my laptop suddenly so slow?
A sudden slowdown usually points to one of four causes: a recent Windows update that is still processing in the background, a malware infection, a hard drive that has become critically full, or an overheating processor that is throttling itself. Check Task Manager to see if any process is consuming unusually high CPU or memory. Run a malware scan, clear temporary files, and check your disk space. If the slowdown appeared after a specific update, check Windows Update history to identify it.
How do I speed up a slow laptop without reinstalling Windows?
All 12 steps in this guide achieve significant speed improvements without reinstalling Windows. Start with disabling startup programs, clearing junk files, and running a malware scan. These three steps alone resolve most common slowdown causes. The power settings adjustment and visual effects changes also deliver immediate improvements with no data loss or system reinstallation required.
Does clearing cache speed up a laptop?
Yes, clearing cache frees up disk space and reduces the amount of data your operating system and browsers need to manage. Browser caches in particular can grow to several gigabytes on laptops used for regular browsing. Clearing them frees storage and can noticeably improve browser responsiveness. System and app caches also accumulate over time and clearing them periodically keeps your storage healthy.
How much RAM do I need to speed up my laptop?
For everyday tasks like web browsing, email, document editing, and video streaming, 8GB of RAM is the minimum you need in 2026. If you regularly run multiple applications simultaneously, edit photos or video, or keep many browser tabs open at once, 16GB will deliver noticeably better performance. If Task Manager shows your RAM usage consistently above 80 percent during normal use, upgrading RAM will make a meaningful difference to your laptop’s speed.
Is upgrading to an SSD worth it for an old laptop?
Yes, replacing a spinning hard drive with an SSD is the most cost-effective single upgrade you can make to a slow old laptop. A laptop that takes three minutes to boot will typically boot in 15 to 20 seconds after an SSD upgrade. App loading times drop from fifteen to thirty seconds to one to three seconds. The cost is typically $40 to $70 and the improvement is immediately obvious from the first boot. For any laptop over three years old still running an HDD, this upgrade extends its useful life by several more years.
How often should I clean my laptop to prevent it slowing down?
Run a basic maintenance routine once a month. Clear browser cache, empty the Recycle Bin, check for Windows updates, and run a quick malware scan. Every three months, run a full disk cleanup, review and remove unused programs, and physically clean the vents with compressed air. Enable Storage Sense on Windows to automate much of the routine disk maintenance so it happens without any effort from you.
CONCLUSION
You Can Speed Up a Slow Laptop Starting Right Now
Now you know exactly how to speed up a slow laptop with 12 proven steps that work on both Windows and Mac. The ten free steps alone can transform a sluggish device that frustrates you every day into one that feels genuinely responsive and quick.
Start with Step 1 right now. Open Task Manager, click the Startup apps tab, and disable every unnecessary program you find there. Then clear your junk files using Disk Cleanup or Storage Recommendations. Then run a malware scan. Those three steps take under twenty minutes combined and address the three most common causes of laptop slowdowns.
If your laptop is still slow after all ten free steps, the hardware upgrade steps 11 and 12 are worth considering. A RAM upgrade or SSD replacement costs less than one month’s phone bill and can extend the useful life of your laptop by three to five years, delaying an expensive device purchase while delivering a dramatically better experience starting from day one.
Bookmark this guide and run through it every six months as part of your laptop maintenance routine. Regular maintenance prevents the gradual accumulation of junk, startup bloat, and dust that makes laptops feel slow over time. Your laptop works hard for you every day. These steps are how you return the favour.
For additional expert guidance on maintaining laptop performance long term read the
Kaspersky guide to making your laptop faster
which covers advanced settings, driver optimisation, and hardware considerations in detail alongside the security angle of laptop maintenance.